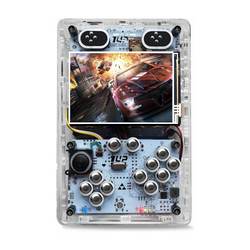
| 1Up PiBoy Price: $125 (unassembled) $170-$200 (assembled) Find it on: AliExpress  |
Rating: 7.5/10
Pros: Cons: |
There are retro handhelds. And then there are retro handhelds. The 1Up PiBoy falls into the latter category. It’s a beast of a handheld (both in emulation capability and appearance) powered by a Raspberry Pi 3B, and separates itself from the rest of the retro handheld market by being able to play Nintendo 64 games flawlessly, with limited Dreamcast and PSP compatibility. There’s nothing else out there right now that can handle this class of games, but in order to buy one, you may need to take out a mortgage.
The first thing that you notice after unboxing the 1Up PiBoy is the sheer size of it. It’s clear from the start that this isn’t a unit that you carry around in your pants pocket. It’s 4×6 inches, and then nearly 1.5 inches deep, making this more of an item you have to put in a backpack. That’s because you’re essentially carting around a mini-computer with you, and the Raspberry Pi 3B is not a compact unit comparatively. Unlike other retro handhelds like the BittBoy V3 that are built for portability for casual train and car rides, you need to make a deliberate decision when taking the 1Up PiBoy with you.
Aside from the size, the form factor is also eye-catching. Unlike other handhelds that have an opaque plastic shell, 1Up decided to make the entire case clear so you’re able to see the innards of the unit. When you fire up the PiBoy, internal lights come on, making it seem futuristic. The buttons are also premium quality, with metallic buttons that are responsive. Aside from the D-pad, the PiBoy also has a high-quality analogue stick, which is key for playing N64 games (more on that below). The PiBoy also features quality stereo sound from two speakers on the upper left and right parts of the unit.
But if you play the PiBoy for extended periods of time, you’ll notice that the clear plastic shell has hard edges that will cut into your fingers. There are also four shoulder buttons in the back that are not well placed, which can be frustrating at times. The 3.5-inch LCD screen defaults to 480*320, but can be adjusted up to 1920*1080. It’s bright and has excellent viewing angles, which is what you’d expect for a gaming unit of this price. The PiBoy also features a best-in-class 10000 mAh Lithium battery, which you’ll need since the Raspberry Pi 3B eats up power at a prodigious rate.
Because the PiBoy runs on a Raspberry Pi 3B, it’s got plenty of opportunities for customization. My particular unit shipped with 10,000 games loaded on a 32GB SD card using the RecalBox system. I ended up flashing RetroPie to a 128GB SD card and loaded my entire library from there given its greater options. Because the Raspberry Pi 3B also has Wifi capability, you can also add games once you connect to your local network as opposed to needing to pop the SD card and physically connect it to your computer.
The PiBoy has an impressive list of consoles its able to handle flawlessly. Of course, it has zero problems with the usual suspects in the 8-bit and 16-bit category of NES, GB, GBC, GBA, GG, Genesis and SNES. What separates the PiBoy from the competition is its ability to also handle the heaviest PS1 and N64 games. On the PS1 side, graphic intensive games like Tomb Raider and Resident Evil had no issues. Mario Kart 64, the gold standard for testing N64 roms on retro handhelds, also performed well. The N64 mapping isn’t perfect because the PiBoy lacks a third directional button set, but it’s still more than playable. Limitations aside, there’s still nothing else on the market right now that can play games at this level. The PiBoy is also capable of handling less intensive PSP and Dreamcast games, but don’t expect to be playing Grand Theft Auto on PSP or NBA 2K on Dreamcast. Still, the fact that that you can emulate some of these games on the go is a game changer.
The main drawback of the PiBoy is the exorbitant price. If you’ve got the technical savvy, you can order a PiBoy for the “low” price of $125 from AliExpress and put the unit together yourself. If you want the completed product sent, the entry level 32GB preloaded drive model will cost around $170, with a 256GB pre-loaded drive putting you close to $200. You’re also going to need to wait 2-3 months for the shipment from China. There are listings every now and then on eBay, but be prepared to pay around $250 for a second-hand unit. No matter what option you choose, you’re paying well over anything else out there, though you are also getting more in return.
The PiBoy absolutely comes recommended if N64 and PS1 emulation is on your “must have” list, and you don’t mind paying $170-200 for a preassembled version. If you’re skittish on the price and want something that you put in your pocket as opposed to a backpack, and don’t mind sticking to 16-bit and below, the 1Up PiBoy will not be for you.